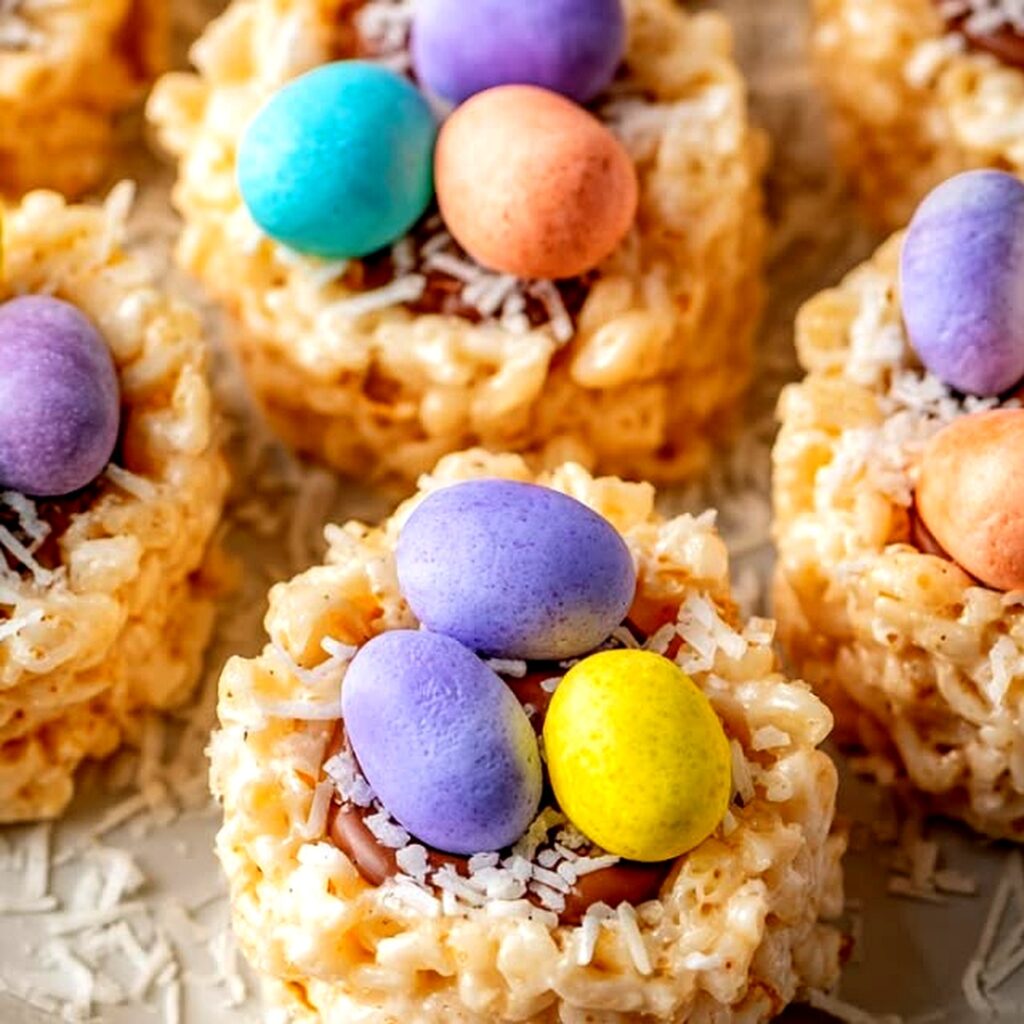
Easter Rice Krispie Nests are the perfect no-bake spring treat that combines crispy cereal, gooey marshmallows, and colorful candy eggs into one adorable dessert. These festive nests are simple to make, kid-friendly, and ideal for Easter celebrations, classroom parties, or family gatherings.
If you’re looking for a quick holiday dessert that looks impressive but takes very little effort, these Easter Rice Krispie Nests are exactly what you need. With just a few pantry staples and about 30 minutes, you’ll have a tray full of cheerful, crunchy-sweet treats ready to serve.
Why You’ll Love This Easter Rice Krispie Nests Recipe
There are so many reasons to make these Easter Rice Krispie Nests this year.
First, they are completely no-bake, which makes them perfect for busy holiday schedules. You don’t need to turn on the oven or worry about complicated baking steps.
Second, they are fun to decorate. Kids love shaping the nests and filling them with candy eggs. It’s a great family activity that doubles as dessert prep.
Third, the texture is irresistible. The buttery marshmallow mixture creates a chewy base while the cereal adds a light crunch. The chocolate eggs add a sweet surprise in the center.
Finally, these Easter Rice Krispie Nests are budget-friendly and made with easy-to-find ingredients.
Ingredients for Easter Rice Krispie Nests
Main Ingredients
- 6 cups Rice Krispies cereal
- 4 cups mini marshmallows
- 3 tablespoons butter
- 1 teaspoon vanilla extract (optional)
- 1 cup candy-coated chocolate eggs
- Cooking spray or butter for greasing
Optional Decorations
- Pastel food coloring
- Shredded coconut (for a realistic nest look)
- Melted chocolate drizzle
- Sprinkles
Ingredient Notes and Substitutions
To get the best texture for your Easter Rice Krispie Nests, use fresh marshmallows. Stale marshmallows can make the mixture stiff and harder to shape.
If you prefer a more natural option, choose organic or dye-free marshmallows. You can also reduce the amount of candy eggs if you want a slightly less sweet version.
For a beautiful nest appearance, mix a few drops of pastel food coloring into the melted marshmallow mixture before adding the cereal. Light pink, yellow, or light green work perfectly for Easter.
If you want a more realistic nest look, sprinkle shredded coconut on top after shaping.
Step-by-Step Instructions
Step 1 – Prepare Your Pan
Lightly grease a 12-cup muffin tin with cooking spray or softened butter. This prevents the nests from sticking and makes removal easy.
Step 2 – Melt the Butter
Place the butter in a large saucepan over low heat. Allow it to melt slowly without browning.
Step 3 – Add the Marshmallows
Add the mini marshmallows to the melted butter. Stir continuously until completely melted and smooth. Remove from heat and stir in the vanilla extract if using.
Step 4 – Mix in the Cereal
Add the Rice Krispies cereal to the marshmallow mixture. Stir gently but quickly until the cereal is evenly coated.
Step 5 – Shape the Nests
Scoop the mixture into the prepared muffin tin. Lightly grease your fingers and press the center down to create a nest shape with a small hollow in the middle.
Work quickly before the mixture begins to firm up.
Step 6 – Cool and Set
Allow the nests to cool at room temperature for about 20–30 minutes. You can also place them in the refrigerator for faster setting.
Step 7 – Add the Candy Eggs
Once fully set, remove the nests from the pan and fill each center with candy-coated chocolate eggs.
Serve immediately or store until ready to enjoy.
Pro Tips for Success
- Melt marshmallows on low heat to prevent hard texture.
- Grease your hands before shaping to avoid sticking.
- Work quickly while the mixture is warm.
- Press gently when shaping to keep nests soft and chewy.
- Use a measuring cup to press evenly into muffin wells.
- Let nests fully cool before removing from the pan.
Flavor Variations
These Easter Rice Krispie Nests are easy to customize.
Chocolate Version: Add ½ cup melted chocolate into the marshmallow mixture.
Peanut Butter Twist: Stir in 2 tablespoons creamy peanut butter for extra richness.
Coconut Nest Style: Mix shredded coconut into the cereal for texture.
White Chocolate Drizzle: Drizzle melted white chocolate over the top after setting.
Pastel Swirl: Divide mixture and tint each portion a different pastel color.
Serving Suggestions
Serve Easter Rice Krispie Nests on a pastel dessert platter for a festive display.
They pair beautifully with:
- Fresh fruit trays
- Lemonade or fruit punch
- Easter brunch spreads
- Coffee or tea
These nests also make adorable edible centerpieces for your Easter table.

Storage and Freezing Instructions
Store Easter Rice Krispie Nests in an airtight container at room temperature for up to 3 days.
Avoid refrigeration for long storage, as it can make them too firm.
Freezing is not recommended because the texture may change once thawed.
If stacking, place parchment paper between layers to prevent sticking.
Nutrition Facts (Per Serving)
| Nutrient | Amount |
|---|---|
| Calories | 160 |
| Protein | 1g |
| Carbohydrates | 28g |
| Fat | 5g |
| Fiber | 0g |
| Sodium | 95mg |
Values are approximate.
FAQ About Easter Rice Krispie Nests
Can I make Easter Rice Krispie Nests ahead of time?
Yes, you can prepare them one day in advance. Store them in an airtight container at room temperature for best freshness.
Why are my nests too hard?
Overheating the marshmallows or pressing the mixture too firmly can cause hard nests. Always use low heat and gentle pressure.
Can I use large marshmallows?
Yes, but you’ll need to measure by weight to ensure proper texture. Mini marshmallows melt more evenly.
Can I make them without a muffin tin?
Absolutely. Shape them by hand on parchment paper and press the center gently with your thumb or the back of a spoon.
Are Easter Rice Krispie Nests gluten-free?
Most Rice Krispies contain malt flavoring, which includes gluten. Look for certified gluten-free crispy rice cereal if needed.
Final Thoughts
Easter Rice Krispie Nests are one of the easiest and most delightful holiday treats you can make. They require minimal ingredients, no baking, and offer endless decorating possibilities. Whether you’re making them with kids or preparing a quick dessert for guests, these cheerful nests will bring color and sweetness to your Easter celebration.
Print
Easy Easter Rice Krispie Nests – Fresh & Fun
- Total Time: 20 minutes
- Yield: 12 nests 1x
- Diet: Vegetarian
Description
Festive no-bake Easter Rice Krispie Nests made with marshmallows and crispy cereal, shaped into nests and filled with candy eggs. Perfect for Easter parties and spring celebrations.
Ingredients
6 cups Rice Krispies cereal
4 cups mini marshmallows
3 tablespoons butter
1 teaspoon vanilla extract (optional)
1 cup candy-coated chocolate eggs
Instructions
1. Grease a 12-cup muffin tin with cooking spray or butter.
2. Melt butter in a large saucepan over low heat.
3. Add marshmallows and stir continuously until fully melted and smooth.
4. Remove from heat and stir in vanilla extract if using.
5. Add Rice Krispies cereal and mix until evenly coated.
6. Scoop mixture into muffin tin cavities and gently press to form nest shapes.
7. Allow nests to cool at room temperature for 20–30 minutes.
8. Remove from pan and fill centers with candy-coated chocolate eggs.
Notes
Use low heat when melting marshmallows to keep nests soft and chewy.
Grease your hands before shaping to prevent sticking.
Work quickly before the mixture firms up.
For a decorative touch, add shredded coconut or pastel food coloring.
- Prep Time: 15 minutes
- Cook Time: 5 minutes
- Category: Dessert
- Method: No-Bake
- Cuisine: American
Nutrition
- Serving Size: 1 nest
- Calories: 160
- Sugar: 17g
- Sodium: 95mg
- Fat: 5g
- Saturated Fat: 3g
- Unsaturated Fat: 2g
- Trans Fat: 0g
- Carbohydrates: 28g
- Fiber: 0g
- Protein: 1g
- Cholesterol: 10mg