When Halloween rolls around, few desserts capture the spirit of the season like a homemade Halloween candy bark recipe. It’s colorful, crunchy, and packed with the sweet chaos of chocolate and candy pieces that everyone loves. Whether you’re looking for a quick, no-bake dessert or a fun way to use leftover trick-or-treat candy, this recipe checks all the boxes. It’s simple enough for kids to help with and impressive enough to bring to a Halloween party. In this article, you’ll learn everything from choosing the right chocolate to creative decoration ideas, variations, and storage tips. We’ll even dive into the history of Halloween candy and answer common questions.

Learn more about sweet Halloween desserts with this easy sweet potato casserole recipe — it’s another seasonal favorite worth trying.
Table of Contents
Essential Ingredients & Best Chocolate Choices
Types of Chocolate for the Perfect Halloween Candy Bark Recipe
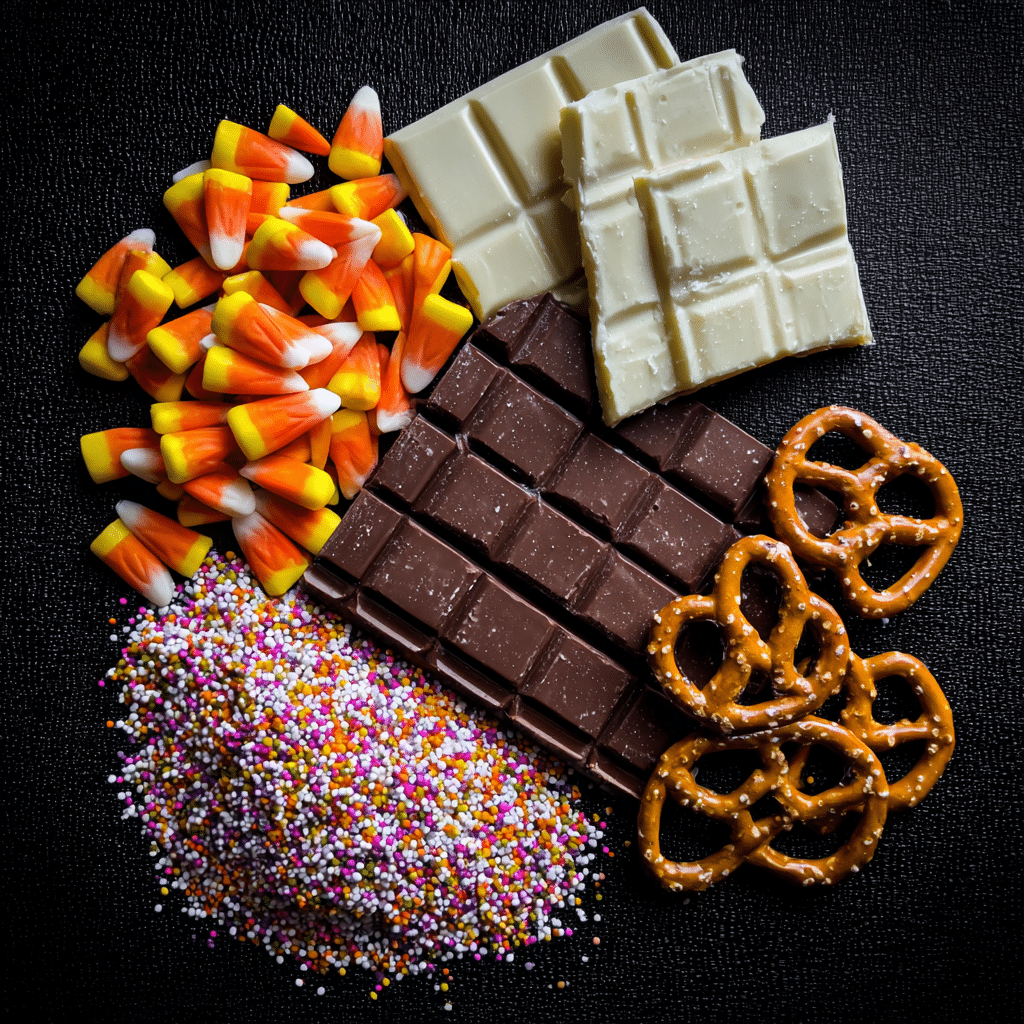
When making a Halloween candy bark recipe, the foundation is your chocolate. The right chocolate sets the tone for both taste and texture. You can use almost any type—dark, milk, or white—but each creates a different flavor profile and look.
- Dark chocolate: Gives a rich, slightly bitter balance to sweet candies like candy corn or M&Ms. It’s perfect if you want your bark to taste sophisticated yet festive.
- Milk chocolate: Smooth, creamy, and a crowd favorite, especially for kids. It melts easily and pairs well with peanut butter cups, caramels, or crunchy toppings.
- White chocolate: Offers a neutral base that’s great for decorating. Its bright surface makes Halloween colors like orange and black really pop. White chocolate also works well when swirled with dark or colored candy melts.
- Candy melts or almond bark: Ideal for those who want foolproof melting and quick setting. These are great for beginners because they’re easy to color and don’t seize up as easily as real chocolate.
Choosing the right base is key to making your Halloween candy bark recipe visually stunning and delicious in every bite.
Check out our pistachio butter recipe to see how rich, smooth textures can elevate any dessert.
The Best Chocolate to Make Bark With
You might wonder: What is the best chocolate to make bark with? The answer depends on what you value most — flavor, appearance, or ease of melting.
Here’s a quick comparison table to help you decide:
| Type of Chocolate | Melting Behavior | Flavor Strength | Best For |
|---|---|---|---|
| Dark Chocolate (60–70% cacao) | Smooth, glossy finish | Bold, rich | Adults and sophisticated flavor profiles |
| Milk Chocolate | Creamy, sweet | Balanced sweetness | Family-friendly versions |
| White Chocolate | Tricky to melt evenly | Very sweet | Decorative swirls and Halloween themes |
| Candy Melts / Almond Bark | Very easy to melt | Neutral flavor | Quick batches and vibrant colors |
For quality results, choose real chocolate bars with cocoa butter instead of compound candy coating. Brands like Ghirardelli, Guittard, or Lindt melt beautifully and taste premium. If you prefer a shortcut, candy melts are fine — just don’t overheat them.
Toppings & Mix-Ins for a Festive Touch
Once your chocolate base is ready, it’s time to pile on the fun. Halloween bark thrives on contrast—both in texture and color. Here are ideas for irresistible toppings:
- Classic candies: M&Ms, Reese’s Pieces, candy corn, Kit Kat chunks, or chopped Snickers.
- Crunchy elements: Pretzels, crushed cookies, graham crackers, or popcorn.
- Colorful flair: Orange and black sprinkles, edible glitter, candy eyes, or colored sugar.
- Flavor twists: Crushed peppermint, toffee bits, sea salt, or coconut flakes for added dimension.
Pro Tip: Add toppings immediately after spreading your melted chocolate. Once it begins to cool, the candies won’t stick as well.
Learn more about easy dessert textures with our sweet potato casserole recipe.
Balancing Sweet and Salty in Your Halloween Candy Bark Recipe
A great Halloween candy bark recipe balances sweet, creamy chocolate with a hint of saltiness. The salt enhances flavor and cuts through the sugar rush of candy pieces. Try crushed pretzels, sea salt flakes, or roasted nuts for that crave-worthy contrast.
The mix of salty and sweet also gives the bark a gourmet twist, elevating it from simple kid’s candy to a party-worthy dessert. Discover great ideas like pecan pie dump cake if you love this combination of flavors.
Creative Flavor Combos for Halloween
Want to make your bark extra spooky and unique? Try these Halloween-inspired combinations:
| Theme | Chocolate Base | Mix-Ins |
|---|---|---|
| “Monster Mash” | Milk chocolate | Crushed pretzels, gummy worms, candy eyes |
| “Witches’ Brew” | White chocolate + green candy melts | Candy corn, orange sprinkles, crushed Oreos |
| “Graveyard Crunch” | Dark chocolate | Cookie crumbs, peanut butter cups, chocolate bones |
| “Pumpkin Patch” | Orange-colored candy melts | Reese’s Pieces, mini marshmallows, caramel drizzle |
Each variation keeps your Halloween candy bark recipe fresh, fun, and ready for any crowd.
Print
Halloween Candy Bark Recipe — How to Make a Spooky, Irresistible Treat
- Total Time: 30 minutes
- Yield: 12 servings 1x
- Diet: Vegetarian
Description
This Halloween candy bark recipe is a quick, no-bake treat made by melting chocolate and decorating with colorful candies. Perfect for spooky parties or gifting.
Ingredients
12 oz dark or milk chocolate
1 cup assorted Halloween candies (M&Ms, candy corn, pretzels)
1 tbsp colored sprinkles or edible glitter
1 tbsp crushed nuts or sea salt (optional)
Instructions
1. Line a baking sheet with parchment paper.
2. Melt chocolate using microwave or double boiler.
3. Spread melted chocolate evenly on parchment.
4. Add candies and toppings quickly before chocolate sets.
5. Chill for 25 minutes, then break into pieces.
Notes
Use quality chocolate for smooth melting.
Store in airtight container for up to two weeks.
Customize colors and toppings for different Halloween themes.
- Prep Time: 10 minutes
- Cook Time: 5 minutes
- Category: Dessert
- Method: No-Bake
- Cuisine: American
Nutrition
- Serving Size: 1 oz
- Calories: 160
- Sugar: 14g
- Sodium: 45mg
- Fat: 9g
- Saturated Fat: 5g
- Unsaturated Fat: 3g
- Trans Fat: 0g
- Carbohydrates: 18g
- Fiber: 1g
- Protein: 2g
- Cholesterol: 5mg
Looking for inspiration? Try fruit and ricotta cake for a post-Halloween dessert that’s light yet satisfying.
Step-by-Step — How to Make Halloween Chocolate Bark
Step 1: Melt the Chocolate
The first and most important step in your Halloween candy bark recipe is melting the chocolate smoothly. If you’ve ever overheated chocolate, you know it can quickly turn grainy or seize. To avoid that, melt it slowly and gently.
You can choose between two reliable methods:
Microwave method:
- Place chopped chocolate or candy melts in a microwave-safe bowl.
- Heat for 20 seconds at a time, stirring in between.
- When only small chunks remain, stop microwaving and let the residual heat melt the rest.
Double boiler method:
- Fill a saucepan with one inch of simmering water.
- Set a heatproof bowl on top, ensuring it doesn’t touch the water.
- Stir continuously until the chocolate is melted and glossy.
Avoid adding any water or liquid flavoring directly to melted chocolate—it can cause it to clump. If you want to infuse flavor, use oil-based extracts or sprinkle spices like cinnamon or chili powder.
Check out our pistachio butter recipe for more tips on handling melted mixtures perfectly.
Step 2: Pour and Spread
Once your chocolate is silky smooth, pour it onto a parchment-lined baking sheet. Use a spatula or the back of a spoon to spread it evenly, about ¼ inch thick. Try not to overwork it; you want a natural, fluid shape rather than rigid edges.
If you’re combining two chocolate types (say, dark and white), pour the darker base first and swirl in the lighter one with a skewer or butter knife to create spooky marble effects.
For an extra Halloween vibe, use orange or green candy melts in zigzag drizzles for a fun, monster-like texture.
Discover great ideas like smores cookie recipe for mastering decorative swirls that elevate your dessert game.
Step 3: Add Your Toppings
Now comes the creative part. While the chocolate is still warm, quickly scatter your toppings evenly across the surface. This step gives your Halloween candy bark recipe its signature festive look.
Here’s a topping guide you can follow or remix to your liking:
| Category | Toppings | Visual Impact |
|---|---|---|
| Classic Candy | M&Ms, Reese’s Pieces, candy corn | Bright pops of color |
| Crunch | Pretzels, popcorn, crushed cookies | Texture and bite |
| Sweet Extras | Mini marshmallows, caramel drizzle, gummy worms | Fun, gooey flair |
| Decorative Touches | Candy eyes, edible glitter, colored sugar | Spooky theme highlight |
Press the toppings lightly into the chocolate so they stick as it cools. Don’t overload — leave some space so the chocolate shows through, giving contrast and balance.
Learn more about sweet potato casserole recipe to understand how visual layering improves dessert presentation.
Step 4: Chill and Set the Bark
When your toppings are in place, transfer the tray to the refrigerator. Let it chill for about 20–30 minutes, or until fully hardened. Avoid freezing unless you’re short on time; freezing can cause condensation when thawed, making the surface sticky.
Once the chocolate has set, remove it from the fridge and peel off the parchment. Use your hands or a sharp knife to break it into irregular, jagged pieces. This rustic look is part of the charm of a Halloween candy bark recipe.
If you prefer uniform pieces, score the bark gently with a knife before it fully sets—this makes cleaner breaks later.
Don’t miss our pecan pie dump cake recipe for another easy dessert that sets perfectly every time.
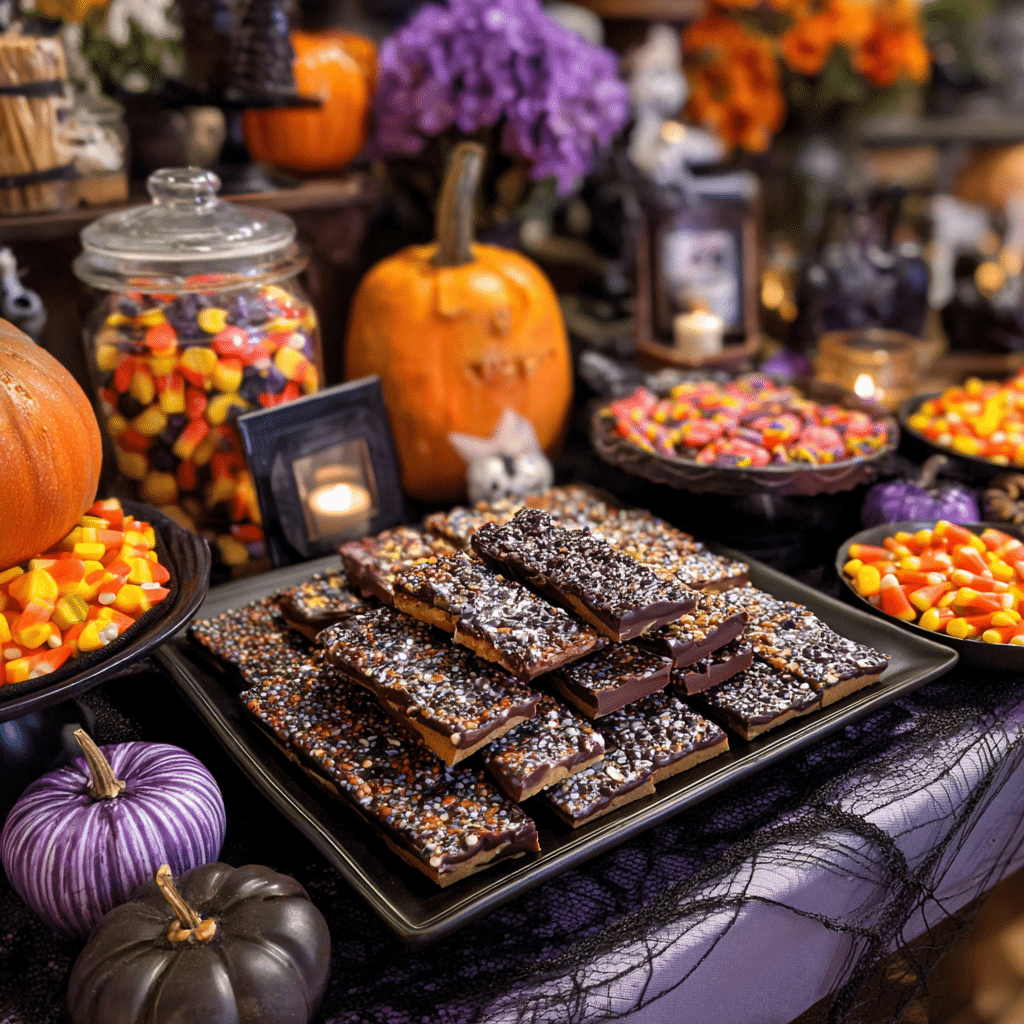
Step 5: Serve or Store
Your candy bark is now ready to serve! Arrange it on a Halloween platter or pack it in cellophane bags tied with orange and black ribbons for party favors.
To store, keep it in an airtight container in a cool, dry place for up to two weeks. For longer storage, refrigerate it for up to a month. Always separate layers with parchment paper to prevent sticking.
If your kitchen runs warm, avoid leaving bark out for too long—it can soften quickly.
Looking for inspiration? Try fruit and ricotta cake after Halloween for a refreshing, lighter dessert contrast.
Step-by-Step Recap Table
| Step | Task | Key Tip |
|---|---|---|
| 1 | Melt chocolate | Go slow, stir often |
| 2 | Pour & spread | Keep layer ¼ inch thick |
| 3 | Add toppings | Press lightly for adhesion |
| 4 | Chill & set | Refrigerate, don’t freeze |
| 5 | Serve or store | Airtight container up to 2 weeks |
Tools, Prep, and Setup Tips
Essential Tools for Making Halloween Candy Bark
Before you melt your first chocolate chip, having the right tools ready will make your Halloween candy bark recipe easier, cleaner, and more fun. You don’t need anything fancy, but a few basics will help create smooth, even bark every time:
- Baking sheet or tray: A rimmed sheet pan keeps melted chocolate from spilling over.
- Parchment paper or silicone mat: Prevents sticking and makes cleanup effortless.
- Microwave-safe bowl or double boiler: The safest ways to melt chocolate evenly.
- Rubber spatula: Helps you stir and spread without wasting chocolate.
- Offset spatula or spoon: To spread melted chocolate evenly across the tray.
- Sharp knife or your hands: For breaking the finished bark into rustic, jagged pieces.
- Topping bowls: Keep all your candies, sprinkles, and nuts within easy reach for quick decorating.
Having your tools prepped before melting helps you move fast while the chocolate is warm and pliable — timing is everything for the perfect Halloween candy bark recipe texture and design.
Learn more about perfect kitchen prep with our smores cookie recipe — it’s a masterclass in timing and layering flavors.
Preparing Your Workstation
When it comes to candy bark, organization beats speed. Set up your space like a mini candy lab. Cover your counter with parchment or silicone to catch stray drips, then lay out your toppings by color or texture. This makes decorating quick and prevents the chocolate from setting before you finish.
Here’s how to organize your prep zone:
| Area | Tools / Ingredients | Tips |
|---|---|---|
| Melting Station | Microwave bowl or double boiler | Melt chocolate in short bursts and stir often |
| Decorating Station | Baking sheet, toppings, spatula | Have everything ready before pouring chocolate |
| Cooling Area | Flat counter or fridge shelf | Ensure it’s level so the bark sets evenly |
Once you’ve melted your chocolate, you’ll have a short window before it hardens, so preparation is key. Having everything in place ensures your Halloween candy bark recipe turns out beautiful every time.
Discover great ideas like sweet potato casserole recipe — another recipe where a little prep makes a big difference.
How to Melt Chocolate the Right Way
Chocolate is delicate, and overheating it can ruin your Halloween candy bark recipe. Whether you’re using milk, dark, or white chocolate, melting it gently is critical. There are two foolproof methods:
1. Microwave Method
- Place chopped chocolate or candy melts in a microwave-safe bowl.
- Heat for 20-second intervals, stirring after each round.
- Stop when the chocolate is 80% melted, then stir until smooth.
2. Double Boiler Method
- Fill a small saucepan with an inch of simmering water.
- Set a heatproof bowl on top, making sure it doesn’t touch the water.
- Add the chocolate and stir gently until melted.
Pro Tip: Avoid any contact with water — even a drop can make chocolate seize into a grainy mess.
If you love working with melted textures, check out our pistachio butter recipe for another silky-smooth creation.
Timing and Temperature Control
One overlooked secret to perfect bark is temperature awareness. Chocolate begins to set quickly once off the heat, especially in cool kitchens. Keep your toppings close and move fast. If you want a layered effect (for example, white chocolate drizzle over dark chocolate), let the first layer cool slightly but not completely before adding the second.
For large batches, melt chocolate in small portions to maintain consistency. And if your kitchen runs warm, pop your tray into the fridge for a few minutes to help the bark firm up evenly.
Don’t miss our pecan pie dump cake recipe for another dessert that rewards careful temperature timing.
Quick Cleanup Tricks
The fun part is eating your candy bark — not scrubbing sticky bowls. To make cleanup effortless:
- Use silicone tools; melted chocolate wipes off easily once cooled.
- Wipe down bowls while still slightly warm.
- Store unused toppings in airtight jars for future bark batches.
- Line all trays and counters with parchment before starting.
Clean as you go, and you’ll spend more time enjoying your homemade Halloween candy bark recipe and less time cleaning chocolate smudges.
Variations, Swirls & Creative Twists
Why Creativity Matters in Your Halloween Candy Bark Recipe
One of the best things about a Halloween candy bark recipe is how endlessly customizable it is. You can tweak the chocolate base, add unique toppings, or experiment with spooky colors and patterns. The more creative you get, the more memorable your candy bark becomes — especially at parties or bake sales. The key is to mix colors, textures, and flavors that make your bark pop visually while staying easy to make.
Learn more about our sweet potato casserole recipe to see how layering colors and textures can enhance presentation and flavor in simple desserts.
Swirl Effects and Marbled Designs
Want your Halloween candy bark recipe to look professional and hauntingly beautiful? Try swirl effects. The marbled look is achieved by using two or more contrasting chocolates — like dark and white — and swirling them together before they set.
Here’s how to do it:
- Pour the base chocolate (dark or milk) onto your parchment-lined tray.
- Drizzle a second color (white, orange, or green candy melts) over it in thin lines.
- Use a skewer or butter knife to gently swirl the colors in figure-eight motions.
This creates a mesmerizing, ghostly effect that looks like it came from a candy shop. Add candy eyes, pretzel sticks, or edible glitter for a magical finish.
Discover great ideas like smores cookie recipe if you enjoy desserts that use swirling techniques to combine flavors and textures beautifully.
Themed Color Combinations for Halloween
Colors make a huge difference in how your bark feels. For Halloween, aim for vibrant contrasts that scream “spooky.” Here are some fun themes to try:
| Theme Name | Base Chocolate | Accent Colors | Suggested Toppings |
|---|---|---|---|
| Pumpkin Patch Bark | White chocolate | Orange + green | Reese’s Pieces, candy pumpkins |
| Monster Madness | Milk chocolate | Purple + black | Gummy worms, candy eyes |
| Witches’ Brew | Dark chocolate | Green | Oreo crumbs, green candy melts |
| Ghostly Swirl | White chocolate | Black + orange drizzle | Mini marshmallows, edible glitter |
| Candy Corn Chaos | Candy melts | Orange + yellow | Candy corn, sprinkles |
Experimenting with these color themes makes your Halloween candy bark recipe stand out on any dessert table or social feed.
Add-Ins and Texture Twists
Bark is all about contrast — smooth chocolate meets crunchy, chewy, or gooey toppings. You can go classic or get wild with your combinations. Here are some fun ideas:
Crunchy Add-Ins
- Crushed pretzels, salted nuts, or popcorn for a salty balance.
- Crumbled graham crackers or wafer cookies for a softer bite.
Chewy Add-Ins
- Mini marshmallows, gummy worms, or chopped caramels for stretch and texture.
Flavor Enhancers
- Sprinkle sea salt or drizzle peanut butter over the top for richness.
- Add a hint of cayenne or chili flakes for a daring adult twist.
Don’t miss our pecan pie dump cake recipe — it’s another dessert that plays perfectly with texture and flavor balance.
Healthy or Themed Alternatives
If you want a lighter or allergy-friendly version, substitute as needed:
- Dark chocolate + nuts for a heart-healthy variation.
- Sugar-free chocolate chips for a lower-sugar option.
- Vegan candy melts for dairy-free diets.
Want a themed twist? Turn your Halloween candy bark recipe into “Harvest Bark” with dried cranberries, almonds, and pumpkin seeds — it’s festive without the sugar overload.
Looking for inspiration? Try fruit and ricotta cake for another way to keep your dessert sweet yet light.
Pro Decorating Tips for a Stunning Finish
- Use a piping bag or zip-top bag for precise drizzles.
- Chill your bark only after decorating to preserve colors.
- Don’t overload toppings — negative space makes designs pop.
- Add edible eyes or colored sugar right before chilling for sharper detail.
- Always break bark by hand for a natural, rustic edge.
A little extra time decorating turns a simple Halloween candy bark recipe into a show-stopping edible art piece.
FAQs
What Is the Oldest Halloween Candy?
Candy corn holds the title as the oldest Halloween candy, first created in the 1880s. It’s colorful, iconic, and a nostalgic addition to any Halloween candy bark recipe — even if it’s not everyone’s favorite treat!
For extra history flavor, add other vintage candies like Tootsie Rolls or candy pumpkins to your bark mix.
What Is the Best Chocolate to Make Bark With?
The best chocolate for bark depends on your taste. For flavor and texture, real chocolate with cocoa butter (like Ghirardelli or Guittard) melts smoothly and hardens with a glossy finish.
If you’re short on time, candy melts or almond bark work great — they melt fast and are easy to color for Halloween themes.
Don’t miss our smores cookie recipe to learn more about working with melted chocolate in creative desserts.
What Is the Most Unhealthy Halloween Candy?
The most unhealthy Halloween candies are those loaded with refined sugar, artificial dyes, and hydrogenated oils — like candy corn, caramel chews, and taffy. These candies spike blood sugar and stick to teeth.
If you’re making a Halloween candy bark recipe, use these sparingly and balance them with nuts, seeds, or dark chocolate for a better nutritional profile.
Conclusion: Why You’ll Love Making a Halloween Candy Bark Recipe
Making a Halloween candy bark recipe is more than just melting chocolate — it’s an experience that blends creativity, nostalgia, and pure fun. From swirling spooky colors to adding leftover candies, this no-bake treat captures everything we love about Halloween: color, crunch, and chaos. It’s easy enough for kids to make, flexible enough for adults to experiment with, and festive enough to impress at any Halloween gathering.
Whether you go for dark, rich chocolate or colorful candy chaos, candy bark reminds us that the best desserts are often the simplest. Break off a piece, share it with friends, and keep the Halloween spirit alive — one sweet bite at a time.
Follow Ummy Recipes on Pinterest and Medium for more no-bake dessert ideas, Halloween candy hacks, and creative seasonal recipes.